Sunday, 9 October 2016

Unknown

Create CRUD module in just single command,with no need to import package at Easylaravel

Create CRUD module in just single command,with no need to import packages etc.

At EasyLaravel ,we have came up with amazing idea to make laravel developers life little bit easier.We have created single command that will create CRUD module with forms controller and much more.

With one command you will get :

  1. Migration created by the name you specify
  2. Model with same name of module in singular form as we make at laravel
  3. Controller with functions created -
    1. Index
    2. Create
    3. Store
    4. Edit
    5. Update
    6. Delete

Steps to make this thing possible -

Step 1 - Create new project

Create new laravel 5.3 project - using
composer create-project laravel/laravel Crud

Step 2- Download file from this link - Click here

Once downloaded copy and paste the file in App\Consoles\Commands directory


Step 3- Open App\Console\Commands\Kernel.php file

Opern Kernel.php file and Register your command ,here is code -


    protected $commands = [
        //

      Commands\CRUDCommand::class
    ]; 


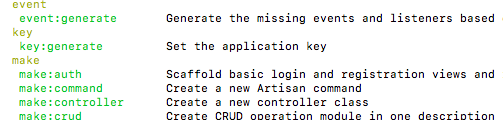
Step 4- Run php artisan command and check whether make:crud command is generated .


Step 5 -Before running command,lets take a look at what parameters the command accepts

php artisan make:crud Module_name --table=table_name --model=Model_name --fields=Form field that are created in views

Eg-

php artisan make:crud posts --table=posts --model=Post --fields=name,email,mobilenumber

Above command accepts parameters as follows

  1. posts= module name you want to give
  2. --table=Table name - which creates migration with table name defined
  3. --model= Name of model you want to create
  4. --fields= list of field separated by ' , ', this fields are automatically created in views

Note :

  • Routes are create in routes\web.php
  • Controller as - Module-Name\BaseController.php in controller directory


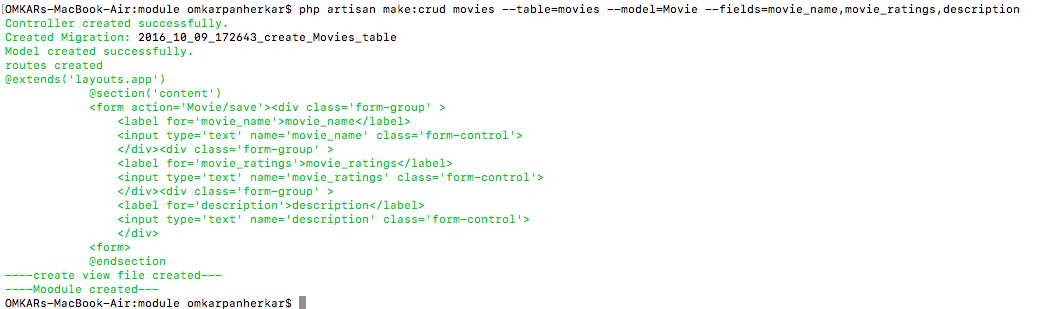
Now lets see what happens when we run this command
php artisan make:crud posts --table=posts --model=Post --fields=name,email,mobilenumber
Future Enhancement

  1. Add code in controller for all functions
  2. Creating Model with table name in it
  3. Perfect documentation

What's missing

We have created this CrudCommand for laravel 5.3 application only. If you want to implement in laravel 5.2 or previous version then change the path of routes file where file contents are appended .

Thank You, If you have any doubts please comment .Like and share to make everyone life easier.

Read More

Tuesday, 13 September 2016

Unknown

Debug and log query using DB::enablequerylog() in laravel

Debugging query in laravel

    Steps for Logging query in Log file
  1. First use DB;
  2. DB::enableQueryLog();
  3. you can dd(DB::getQueryLog())
  4. To get last executed query use - end(DB::getQueryLog())
     DB::enableQueryLog();
       // Run your queries
       // ...

       // Then to retrieve everything since you enabled the logging:
       $queries = DB::getQueryLog();
       foreach($queries as $i=>$query)
       {
           Log::debug("Query $i: " . json_encode($query));
       }

       Log::debug('Last query is :'.$last_query = end($queries););


In next post we will learn more about relationship methods

  1. with()
  2. has()
  3. whereHas()
  4. withCount()

Thank you.

Read More

Thursday, 1 September 2016

Unknown

List of eloquent Relationships in laravel -Part 1

How relationships work in laravel

Lets understand this concept using following example,there is blog where user creates many posts -

There are 2 tables - 1.users, following are the fields-

Users table model name- User
  1. id
  2. name
  3. email
2.posts,following are the fields-
Posts table model name- Post
  1. id
  2. body
  3. desc
  4. user_id

Below is User Model,since user can create many posts so we implement hasMany() relationship in model

Eloquent will automatically determine the proper foreign key column on Post Model

    namespace App;
    use Illuminate\Notifications\Notifiable;
    use Illuminate\Foundation\Auth\User as Authenticatable;
    class User extends Authenticatable
    {
        public function post()
        {
            return $this->hasMany('App\POst');
        }
    }
    

Below is Post Model,since each post belongs to speccific user, we implement belongsTo() relationship.

First argument of belongsTo() is path of model , second argument is foreign_key here its user_id

    namespace App;
    
    class Post
    {
        public function user()
        {
            return $this->belongsTo('App\User','user_id');
        }
    }
    

Lets tinker it >

  1. Run composer and type php artisan tinker
  2. $user=App\User::find(1) - it gives user record whose id is 1
  3. To get all post related to $user we write > $posts=$user->posts()->get()
Lets tinker it to get user related to post >
  1. Run composer and type php artisan tinker
  2. $post=App\Post::find(1) - it gives Post record whose id is 1
  3. To get user to whom this post belongs we write > $user=$post->user()->first()
  4. we can retrieve use by accessing Eloquent relationships as properties > $user=$post->user

In next post we will learn more about relatonships -

  1. hasMany()
  2. hasOne
  3. Many to Many

Thank you.

Read More

Monday, 29 August 2016

Unknown

Whats cool about dependency injection in laravel 5.3 at easylaravel

What is dependency injection ??

If you want to use any functionality or components in your controller like send mail ,you register that class in controller and then create its object in every function but when we want that functionality in every function or methods of controller then you use dependency injection


Create dependency injection ,follow steps -

  1. Register component

    Register that component class using - use Class eg- use Mailer;

  2. Create variable in class and initialize it in constructor as follow :
    				protected $mailer;
    				public function __construct(Mailer $mailer)
    				{
    				$this->mailer = $mailer;
    				}
    			
    Here, now depenedncy is injected in constructor and we access it using $this->mailer; Dependency can be anyclass even model,like -
    				protected $user;
    				public function __construct(User $user)
    				{
    				$this->user = $user;
    				}
    			
    ,now we dont need to create model object in function like
    	
    			public function store()
    			{ 		
    			$user= new User;  
    			}
    		
    we do it as -
    			public function store()
    			{ 
    			$user= $this->user;
    			$user->name='ABC';
    			$user->save();
    			}
    	

Thank you.

Read More

Sunday, 28 August 2016

Unknown

Part 1- Create command line apps using make:command laravel 5.3 at easylaravel

What is artisan ??

Artisan is commandline interface to create controller ,migration,model and also our own commands that will do specific task.Artisan provides list of commands

type : php artisan list

Create command ,follow steps -

  1. Create Command -
    Run composer and type - " php artisan make:command Say " ,
    command will be created in console/commands/Say.php
  2. Edit your command file and add logic that needs to be executed -
    In Say.php edit -
    1. Edit name and signature of the console command.edit -
      protected $signature = 'Say:hello {user}';
      {user} - command arguments
      eg- 'php artisan Say:hello Omkar'; ,here omkar is argument
    2. You can add dependencies inside constructor and laravel will take care of rest of it.
      protected $user;
      public function __construct(User $user) {
      parent::__construct();
      $this->user = $user;
      }
    3. Write command logic i.e the code that you want to execute when command runs in artisan
      public function handle()
      {
      $this->comment('Hello : '.$this->user);
      }
  3. Register command
    Register command in Console\kernel.php protected $commands = [ Commands\Say::class ];
  4. Run Command -
    php artisan Say:hello

Thank you, Part 2 will be posted soon.

Read More

Monday, 22 August 2016

Unknown

Encrypt Data before someone hacks using Crypt facade - Easylaravel

Introduction :

Encryption of information on web is very crucial part nowdays , laravel comes with Crypt facade to implement encryption in laravel.

Usage:

  • Step 1 : First set key in config\app.php with random string . key should be 32 characters
  • Step 2 : Use Crypt facade for encryption and decryption.

Encryption :

$encrypted_value=Crypt::decrypt($request->password);

Decryption :

$decrypted_value=Crypt::decrypt($encrypted_value);

Example :


namespace App\Http\Controllers;
use Crypt;
use App\User;
use Illuminate\Http\Request;
use App\Http\Controllers\Controller;
use Illuminate\Contracts\Encryption\DecryptException;
class UserController extends Controller

{
public function storeSecret(Request $request, $id)
{
$user = User::findOrFail($id);
$encryptedValue=Crypt::encrypt($request->secret);
$user->fill([
'secret' =>$encryptedValue
])->save();
echo ‘Encrypted value : ’.$encryptedValue.’
’;
try {
$decrypted = Crypt::decrypt();
echo ‘decrypted value : ’.$decrypted.’
’; } catch (DecryptException $e) {
}
} }

Read More

Thursday, 11 August 2016

Unknown

How request is handled in laravel -easylaravelBlog

How request is handled in laravel

When request to laravel application is made ,that requests are directed to public/index.php directed by web server.Then index.php loads composer generated autoloader definition,and then instance of laravel application is retrieved from bootstrap/app.php

HTTP / Console Kernels

Once we get instance of application,incoming request is sent to HTTP kernel or console kernel ,depending upon type of request. HTTP kernel is located inapp/Http/Kernel.php. The HTTP kernel extends the Illuminate\Foundation\Http\Kernel class, which defines an array ofbootstrappers that will be run before the request is executed. These bootstrappers configure error handling, configure logging, detect the application environment, and perform other tasks that need to be done before the request is actually handled.
The HTTP kernel also defines a list of HTTP middleware that all requests must pass through before being handled by the application. These middleware handle reading and writing the HTTP session, determine if the application is in maintenance mode, verifying the CSRF token, and more.

Service Providers

One of the most important Kernel bootstrapping actions is loading the service providers for your application. All of the service providers for the application are configured in the config/app.phpconfiguration file's providers array. First, the register method will be called on all providers, then, once all providers have been registered, the boot method will be called. Dispatch Request

Response

Once the application has been bootstrapped and all service providers have been registered, theRequest will be handed off to the router for dispatching. The router will dispatch the request to a route or controller, as well as run any route specific middleware.
Read More

Wednesday, 10 August 2016

Unknown

Laravel 5.3 released with new features -routes,query builders collection Tutorial at easyLaravel Blog

Laravel 5.3 making life better.
https://lh3.googleusercontent.com/Ame1rw9PdbNIHIck2ARjxaJI2Cx-GzVAf8pFyvJ05x981LWiQWpNNk-VqoWVabOiR4STIq2ZrW73OUm97OnKz9HlYLs1xv90rgZJJaAQA4OcMl-kL6-SI4RoL_kA4p6oC0MpSwc_

Install laravel 5.3

“Composer create-project laravel/laravel laravel53 dev-develop”

Directory Structure :

 
laravel 5.3 directory structure easylaravel blog

Simplified Routes in parent folder named “routes”

Routes.php in laravel is provided in parent folder of laravel project with two files:
1. Web.php
All web application routes are entered in routes/web.php.
               
laravel 5.3 routes/web.php for web routes- easylaravel blog

2. Api.php
All api route calls  should be written in routes/api.php file .The advantage is that we get prefix added and required middleware’s  are only applied for api calls such as ‘api.auth’ and throttle.

 
laravel 5.3 routes/api.php for api routes- easylaravel blog


Events,listener,policies :
Keeping newbie’s in mind,laravel has made directory structure more concise by showing only what is needed to make application run.Folders like ‘events’,’jobs’,’policies’ are not shown.
You wont see it until u run the command.When you create events or jobs the event directory is created with event file in it.

Project/app directory structure
laravel 5.3 get events,policies when needed- easylaravel blog
laravel 5.3 get events,policies when needed console command- easylaravel blog


laravel 5.3 get events,policies- easylaravel blog


Query builder returns collection

Apply methods on collection in laravel 5.3 query builder.In laravel previous version query builder did not returned any collections when DB::raw() queries were run, so we were not able to use collection method on them. So to make our life more easier laravel has added this functionality.


Read More

Tuesday, 9 August 2016

Unknown

What is laravel framework,difference between laravel and Core php -easyLaravelBlog

What is laravel?
Laravel is open source ,free framework created by Taylor Otwell ,used for developing web application using MVC model.

So whats MVC?
M-Model is used for communicating with database.
V-View is the interface that we show in browser
C-Controller isplace where we write business logic or algorithm, we can get form data manipulate in and store it in database using model

Let me give u example ,imagine you want to add two numbers in laravel as follows
·         we accept two  inputs from user so we create view that has form and two inputs field and submit button .
·          we write business logic that is addition of two inputs in controller
·         Store it in addition table using model.

So you got the idea how each one is necessary.

Whats difference between laravel & core php?
  • Laravel is framework we have controllers where we write business logic , views where we show data and forms , model used to interact with database ,whereas in core php we cant differentiate this ,.
  • Laravel comes with basic authentication which is session based and also token based.we will discuss it in later post whereas in core php we have to write authentication logic.
  • In core php we have to write code for each basic features  whereas Laravel provides helper functions which can be used in code anywhere without need to write a single logic.Helpers are provided for-
    •    Array.
    •    Strings
    •    Urls
    •    Paths
  • Modification in core php is time consuming ,and mostly if customer ask for project enhancement which  is developed in core php ,nearly 50% developers says no .In framework we need not worry about changes ,changes are welcome because we just need to add views , register routes ,write business logic in controller and you all set.


   According to  tutorialspoint -
  We assume that Core PHP means solving a Mathematical problem by using paper and pen. Frame       work means solving Mathematical problem by using a calculator.

Comment if you have any doubts in this post.
Read More

Wednesday, 11 May 2016

Unknown

Roles in laravel -Create roles for Securing Routes according to users in Laravel 5.2 at easyLaravel

Note : If you want to separate admin and users or customer or seller ,this tutorial is for you.

Click here to download all file of this tutorial - Download

Roles are important in web application like in blog there is admin who will create post and users who will see post and comment on them ,so in order to differentiate admin from user we use role concept.

Apply Roles to any route and hence secure routes according to roles.
Step 1: Create migration Create_Role_Table.php to create Roles table. We use artisan command -
" php artisan make:migration Create_Roles_Table --create=roles "
Once migration is created update migration file following code  -

   public function up()
    {
        Schema::create('Roles', function (Blueprint $table) {
            $table->increments('id');
            $table->string('name', 40);
            $table->string('description', 255);
            $table->timestamps();
          
        });
    }
    public function down()
    {
        Schema::drop('Roles');
    }

Step 2: Create migration AddRoleIdUserTable.php to add foreign key roleid to user table. We use artisan command -
" php artisan make:migration AddRoleIdUserTable --table=roles "
Once migration is created update migration file following code  -

  public function up()
    {
        Schema::table('users', function (Blueprint $table) {
            //
              $table->integer('role_id')->unsigned();
             $table->Foreign('role_id')
                     ->references('id')
                   ->on('roles')
                      ->onDelete('cascade');
        });
    }
    public function down()
    {
        Schema::table('users', function (Blueprint $table) {
            //
              $table->dropColumn('role_id');
        });
    }

Step 3 : Creating Role model and establishing relation with user.
Create Role model using artisan command =
" php artisan make:model Role "
Add following code in Role.php

  protected $table = 'roles';
    
    public function users()
    {
        return $this->hasMany('App\User', 'role_id', 'id');
    }
Above code says that User has many role.

Add Following code in User.php model file -
 protected $hidden = ['password', 'remember_token'];
        public function role()
    {
        return $this->hasOne('App\Role', 'id','role_id');
    }
    public function hasRole($roles)
    { 
        $this->have_role = $this->getUserRole();
        // Check if the user is a root accoun
        if($this->have_role->name == 'Root') {
            return true;
        }
        if($this->have_role->name == 'User') {
                //check if user is a USer account
               //dd($this->have_role->name);
            return true;
        }
        if(is_array($roles)){
            foreach($roles as $need_role){
                if($this->checkIfUserHasRole($need_role)) {
                    return true;
                }
            }
        } else{
            return $this->checkIfUserHasRole($roles);
        }
        return false;
    }
    private function getUserRole()
    {
        return $this->role()->getResults();
    }
    private function checkIfUserHasRole($need_role)
    {
        return (strtolower($need_role)==strtolower($this->have_role->name)) ? true : false;
    }

In above code , we establish relationship creating funtion roles() and define relation using hasOne() eloquent relationship helper that says user has one role.

Next function hasRole() checks that when user is logged in and access a route, it checks whether user has role or not.

Step 5 - Create Middleware using artisan command -
" php artisan make:middleware CheckRole "

Add Following Code in handle() method-
     public function handle($request, Closure $next)
    {
   // dd($request);
         $roles = $this->getRequiredRoleForRoute($request->route());
      // dd($roles);      
        // Check if a role is required for the route, and
        // if so, ensure that the user has that role.
         //dd($roles);
         if($roles[0]=='Guest')
         {          return $next($request);
         }
         else
         {
                if($request->user())
                {                        if($request->user()->hasRole($roles) || !$roles )
                        {
                            return $next($request);
                        }
                }
      
        else
        {                 return response([
            'error' => [
                'code' => 'INSUFFICIENT_ROLE',
                'description' => 'You are not authorized to access this resource.'
            ]
        ], 401);  
        }
         }     
    } 
        private function getRequiredRoleForRoute($route)
    {
        $actions = $route->getAction();
        return isset($actions['roles']) ? $actions['roles'] : null;
    }
}.

The above codes check the role applied to route with roles of user .

Now we register middleware in kernel.php file in App\Http directory and Add it in route middleware array.
  protected $routeMiddleware = [
        'auth' => \App\Http\Middleware\Authenticate::class,
        'auth.basic' => \Illuminate\Auth\Middleware\AuthenticateWithBasicAuth::class,
        'can' => \Illuminate\Foundation\Http\Middleware\Authorize::class,
        'guest' => \App\Http\Middleware\RedirectIfAuthenticated::class,
        'throttle' => \Illuminate\Routing\Middleware\ThrottleRequests::class,
        'roles'         => \App\Http\Middleware\CheckRole::class,
    ];

Step 6- Apply middleware to any route in routes.php you wish.

  Route::get('Guest', [
    'middleware' => ['roles'], // A 'roles' middleware must be specified
    'uses' => 'GreetingController@about',
    'roles' => ['User'] ]);


Click here to download all file of this tutorial - Download
Read More

Tuesday, 10 May 2016

Unknown

Blade template Tutorial : Create Master Page and Child page using blade templates in laravel at easyLaravel

What is Blade Template -
Blade is template engine provided with laravel ,the beauty of blade template is that we can also write php code and syntax inside blade template files.

How to use -
To use blade template in laravel save your views files using .blade.php extension instead of normal .php extension.
Example : If view file which is located in resources/view directory ,its  name is index.php the to use blade syntax in that file rename it to - index.blade.php

To understand master page and child page working in laravel we use simple example .
Master Page is like a layout in which  we can create section as well as yeild other section

Child page are pages which extends master page and we write content that we needed to show for that page by creating section and other work is completed by master page.
Step 1-Define master page
Step 2-Define Child page by extending master page

Step 1-Define master page
We use @section directive to define section in  blade view files and @yeild directive is used  to display content of section.
We are going to create master page and child page in order for you to get an idea about how use blade enging syntax.
Lets create one blade file named as master.blade.php and insert following code
<!-- Stored in resources/views/layouts/master.blade.php -->

<html>
    <head>

    </head>
    <body>
        @section('sidebar')
            Inside this you can write html ,php code and javascript also.
        @show

        <div class="container">
            @yield('content') //content of section named 'content' will be displayed
        </div>
    </body>
</html>
Now as you can see master.blade.php file has @yeild directive which will show content of sections 'title' and 'content'.

Now we create child page named about.blade.php and extend the master page and  create section named 'content' and view it in browser and see the magic.
Create file named about.blade.php and save it in resources/views directory. and write following code.
<!-- Stored in resources/views/child.blade.php -->

@extends('layouts.master')

@section('content')
    <p>This is my body content.</p>
@endsection
Now using @extends we extend master page named master.blade.php ,@section('content') directive creates section named 'content' ,now we write any content using Html tags and end the section using @endsection.

Since now about page is ready we view it in browser by giving route in routes.php file as follows:

Route::get('about', function () {
    return view('about');
});

2.Show data passed to view using blade template :
We use compact()  php function to pass data to view ,we can pass array of data also to view .
Route::get('about', function () {
    $name="Easy Laravel";
    return view('about',compact('name'));  
});
Show data in view :
We use {{ variable name }} to display data from variable
<!-- Stored in resources/views/about.blade.php -->

@extends('layouts.master')

@section('content')
hello {{ $name }}
    <p>This is my body content.</p>
@endsection
3.Conditions and Loops:
Conditions :
<!-- Stored in resources/views/about.blade.php -->

@extends('layouts.master')

@section('content')
hello
@if ($name == 'Easy Laravel')
    Welcome 
@else
   Bye Bye
@endif
<p>This is my body content.</p> @endsection
For Loops and Iterations  
<!-- Stored in resources/views/about.blade.php -->

@extends('layouts.master')

@section('content')
hello {{ $name }}
@for ($i = 0; $i < 10; $i++)
    The current value is {{ $i }}
@endfor

@foreach ($users as $user)
    <p>This is user {{ $user->id }}</p>
@endforeach
<p>This is my body content.</p> @endsection
Tips : Practice all these blade tricks and in next tutorial we will create Todo application in laravel


Read More

Sunday, 24 April 2016

Unknown

Views in Laravel : Create views and use them in applications at EasyLaravel

What are views in laravel :
View separates controllers application logic from presentation logic.
Views are stored in resource/views directory.

Create a view name 'greeting.php' and you can create responsive view that is shown in browser whenever request is made.

Example : Render a view 'greeting.php' when a request '/greeting' is made in the browser .
Step 1:Define a route in Routes.php
" Route::get('/greeting','GreetingController@index'); "

When route request 'greeting' is made GreetingController class index() method is called,in that index() we will reference view using view() method.
Step 2:Create GreetingController using artisana console -
" php artisan make:controller GreetingController "
Step 3 :Add index() method-
 public function index()
{

 }
Step 4: Create view and add html tags -
Create 'greeting.php' file in  resource/views directory.add following content-
<html>
  <body>
     <h1>Welcome</h1>
   </body>
</html>
Step 5:Reference view using view() method in index() method of GreetingController -
 public function index()
{
 return view('greeting');
 }
view() method accepts two parameters -
1.name of view file which is 'greeting'.
2.array of data that should be made available to the view
Step 6:Passing data to view
As we said second argument of view() helper method accepts array of data that we want to pass to view.
Eg: Pass name to view greeting.php 
 public function index()
{
 $name='EasyLaravel';
 return view('greeting',['name'=>$name]);
 }
 Now in view greeting.php file echo $name as follow-
<html>
  <body>
     <h1>Welcome <?php  echo $name?> </h1>
   </body>
</html>


You will get out.
Try it and if any doubts comment below.

Summary:
In View we write Presentation logic.
We reference view file using view() helper functio.
Read More

Saturday, 23 April 2016

Unknown

Model in Laravel - Create model and interact with table at easyLaravel

Since in last post we created a migration for Articles table,now lets create model so that we can insert ,update rows in table.
So now you have got an idea what is model.

Definition of Model in laravel :
Each database table has a corresponding "Model" which is used to interact with that table.

Lets create Model 'Article' for table 'articles' using artisan console:

Step 1 : Run a composer.

Step 2 : Add following code -
" php artisan make:model Article "
Note: Plural name of the class will be used as the table name unless another name is explicitly specified using protected $table property
Model named Article is created in 'app' directory and extends 'Illuminate\Database\Eloquent\Model'

Properties in Model :
$table - $table property is used to specify table name.

' protected $table = 'articles';  '.
$primaryKey - specify primary key for table
' protected $primaryKey= 'id';  '
Lets interact with table add some rows and find them using methods of query builder.

Using php artisan tinker console to add ,update and find records in tables of article model.

1.Insert new row into articles:
 Step1: Run Composer and add following command-
"php artisan tinker ",you will get-

Create object of article model using following command:
">$article=new App\Article ".

We get $article object so lets add values to columns of articles table-
>$article->title ='First Article'.
>$article->description='Lorem Ipsumad'.
>$article->save();

save()method saves the record and you can check the database.
Note: You still have access to $article object so that we can update the article and again save().
>$article->title='First Article of Me';
>$article->save().

2.Find a record using find() function
Step 1: Run Composer and add following command-
"php artisan tinker "
Step2: Create object of article model using following command:
">$article =App\Article::find(1) ".
find() method accepts single parameter which primary key of that table .here 1 is primary key and $article object contains record id=1.
Find() method in laravel to get row
Summary:
Now since you got an idea of model ,in the next tutorial we are going to learn interesting topics :

  • Views
  • Blade templates


Read More